Sunny Ahuwanya's Blog

Mostly notes on .NET and C#

A Simple ASP.NET State Server Failover Scheme

Introduction

A common question that comes up when setting up a web application to use the state server is “what happens if the state server fails?” and the answer is that the web application fails.
This article proposes a failover solution, such that if one state server goes down, the web application switches to another one. In addition, the solution performs state server load balancing by distributing requests across available state servers.

Overview

The proposed failover system monitors a specified list of state servers to determine which ones are running; the web application can then decide on which one to use. The process of monitoring a state server is expensive, so it is handled by a dedicated external service. This service notifies the web application (and other web applications) when state servers come online or go offline. The process is illustrated below.

How it works

The failover system comprises two parts.

The first part is the monitoring service, which polls the status of a given list of servers by simply connecting and disconnecting to the servers continuously. If there are any changes in the availability of servers, for instance, a server that was previously unavailable becomes available or vice versa; one or more status files are updated to reflect the change. A status file contains information about the state servers in use and their online status. ASP.NET applications can detect changes to these status files and react accordingly.

The monitoring service has a configurable time period, within which a monitored server that comes online must stay online before the service will update the status files with the change in status for that server. This helps reduce connections to servers that are successively coming online and going offline -- the so called flapping server phenomenon. The length of this time period is determined by the ServerWarmUpTime configuration setting.
It's important to note that the monitoring service can detect the availability of other types of servers, not just ASP.NET state servers, and so can be used for other purposes.

The second part consists of configuration settings and code in the web application that expands upon Maarten Balliauw's most excellent series on state server partitioning and load balancing. The web application is configured such that the configuration file is extended to the external status file. Changes made to the status file cause the application configuration settings to be re-read and updated with the new values. Thus, the web application always has the latest server availability information and uses the information to distribute requests to available state servers -- achieving both load balancing and failover support.

For example, if there are five state servers in use and they are all running, the status file will indicate that the five servers are available; the web application then distributes state server requests evenly across the five servers. If two of the state servers were to suddenly go down, the status file will be updated to indicate that only three state servers are available; the web application then redistributes state server requests to only those three. The overall effect is that during a state server downtime, users will be able to continue using the application. Some sessions will be lost, but that is a slight annoyance compared to the entire application going down for a long period of time.

To use this load-balanced, failover-supported setup, the web application needs a few configuration changes and two code files in the App_Code folder; namely ServerListSectionHandler.cs and PartitionResolver.cs. ServerListSectionHandler.cs enables the status file to be read as part of the application configuration. PartitionResolver.cs contains a custom state server partition resolver class that decides which state server to connect to. This class also tries to pin users to particular state servers so that changes in the status file only affects users whose session was stored on the failing server.

Using the code

To set up the server monitoring service

  1. Download the source files.
    You can download the source code at http://www.codeproject.com/KB/aspnet/stateserverfailover.aspx


  2. Open up the ServerMonitor solution in visual studio.

    The solution contains two projects. One runs the service as a console application and the other one runs it as a windows service. The ServerMonitorService project compiles as a windows service and can be installed and uninstalled with the included install_service.bat and uninstall_service.bat files. The ConsoleServerMonitor project runs the service as a console application, which is a lot easier to test and debug. Both projects share the same sources and function identically.

  3. Open up the project's application configuration file.

  4. In the Servers section, specify the state servers you want to use, like as shown below:

    <Servers>
        <!-- List of servers to poll -->
        <add key="Server1"  value="localhost:42424" />
        <add key="Server2"  value="appserver1:42424" />
        <add key="Server3"  value="72.27.255.9:42424" />    
    </Servers>
     

  5. In the StatusFilePaths section, add the full file pathname of the status file.
    This file should be located in the folder containing your web application or in subfolders.

    You can add multiple paths, if you want to notify multiple web applications, as shown below:

    <StatusFilePaths>
        <!-- List of file paths where status files are saved/updated -->
        <add key="Web1" value="C:\Inetpub\wwwroot\MyWeb1\server_status.config.xml"/>    
        <add key="Web2" value="C:\Inetpub\wwwroot\SuperWeb2\server_status.config.xml"/>        
    </StatusFilePaths>
      

  6. Build the project.

  7. If you built the ServerMonitorService project, navigate to the output folder and run install_service.bat to install the service.

  8. If you built and installed the windows service, you can start Server Monitoring Service in the Services list. If you built the console server, run ConsoleServerMonitor.exe or simply start debugging from Visual Studio.

  9. Note that the status files are created in the specified folders.

To configure your web application

  1. Open your web application in visual studio

  2. Add an App_Code ASP.NET folder to your application, if your application does not have one.

  3. Copy PartitionResolver.cs and ServerListSectionHandler.cs from SampleWeb\App_Code folder to your web application's App_Code folder.

  4. Open the project's web configuration file. (Add a new web configuration file if your application does not have one)

  5. Add a new SessionStateServers section element in the configSections collection as shown below:

    <configSections>
    	<section name="SessionStateServers" type="ServerListSectionHandler" restartOnExternalChanges="false"/>
    </configSections>
    

  6. Configure the newly added SessionStateServers section to be read from an external file as shown below:
    <SessionStateServers configSource="server_status.config.xml"/>
    
    
    (If the status file has a different filename, specify that instead)

  7. In the system.web element, configure the application to use the custom partition resolver as shown below:
    <system.web>    
        <sessionState mode="StateServer" partitionResolverType="PartitionResolver"/>
    ...


  8. Your web application is now set up to use the state server failover system

Points of Interest

I originally wanted the monitoring service to update a single status file, which multiple web applications could share. That plan didn't work because ASP.NET only works with external configuration files that are located in the application folder or in its subfolders. Because of this restriction, different web applications can not share one external configuration file.

It's not necessary to set the restartOnExternalChanges attribute of the section element in the web.config file to true. Setting this attribute to true causes the web application to restart whenever the external config file is updated, which will cause any data stored in the Application object to be lost.
The web application will still read the latest data in the external config file, if the attribute's value is set to false, without restarting the application.

The name of the root element of the status file is determined by the StatusXMLRootTag setting of the monitoring service's configuration.
The name must match the name of the new section you add to your web application's web.config file. The name must also be specified in the state server partition resolver class (PartitionResolver.cs)


Why Session State Should Not Be Stored In A Distributed Cache

Web developers often refer to session state stores and caches interchangeably, while in actuality they serve different purposes.

A cache serves as a caching layer between a web application and an external data source. Caches exist mainly to lighten the load on the external data source, thus improving the performance of the application.

The purpose of a session state store is to store a user’s workspace. Session state stores enable client activity to be persisted consistently across several HTTP requests.

Applications that utilize a cache write to the external data source, typically a database, and read from the cache. This technique can significantly improve the performance of applications that mostly read from the data source.
Caches are designed to be read speedily, simultaneously by many clients and threads. Some cache implementations can link the cached object to the data source, such that if the data source is updated, the cache is invalidated.

Session state stores are not linked to external data sources by design, although it can be consumed by an application to do so. While it may be necessary to store certain parts of a client’s session state to a database, there is usually no need to store all of the session state to a database. In fact, many database-less web applications rely solely on session state to operate.
Session state implementations are designed such that each client has exclusive access to its session data. Even though caches can be consumed by an application to simulate this, exclusivity is not enforced and there is always a chance that a client will be able to access another client’s session data due to either poor design or security flaws.

A distributed cache spreads out an application’s caching layer across many machines, which allow high-traffic web applications to scale out by adding more machines as demand increases. Performance can also be improved by distributing session state data across many machines; therefore, it is worthwhile to examine the requirements and nuances of cached data and session state before deciding on a distributed solution to apply.

Distributed caches, like local caches, are most effective when used to cache data that changes infrequently. They also support simultaneous fast reads of a cached object by many threads. This is where session state sharply differs from cached data.

Session state has little need for speedy multiple-thread access to a single stored resource because a client can only exclusively read or update its session. In addition, the usage pattern of session state is unpredictable. Some applications update session data very frequently while some do not. Session state storage designers normally safely assume that session state is write-heavy.

Caches are configured by default to use either an optimistic concurrency mechanism or no concurrency control at all, to access cached data. This design is driven by the strong requirement to eliminate blocking by any means possible, and works superbly due to the lower proportion of writes to reads.
Session state stores, on the other hand, utilize a pessimistic concurrency mechanism to access stored data. This works effectively because of the exclusive nature of resource access.

The number of concurrent session state accesses to a stored resource can increase if a user opens up several web browser instances of the same application or if the application makes use of numerous AJAX calls. Notwithstanding multiple instances and AJAX-intensive applications, a user’s session cannot have more than a handful of concurrent access attempts.
A pessimistic concurrency mechanism, as used by session state stores, can gracefully handle a few concurrent accesses on a write-heavy resource, and more importantly, provide consistent data to all operations. Inconsistencies in served data can arise, if a cache with no concurrency control is employed to store write-heavy session state. This problem becomes more apparent if the application is AJAX-intensive.

Critical applications that rely on session state require failover and redundancy support. These features are usually built into commercial session state storage solutions.
Caches have no need for failover or redundancy because caches are simply a caching layer: if the requested data cannot be retrieved from the cache, it can always be fetched from the primary source. Therefore, most distributed cache implementations do not support failover or redundancy; issues solution architects seldom remember when moving session storage to a distributed cache.

The conundrum of where to store session state arises when an application needs to scale to accommodate more users.
While there are a few commercial distributed session state storage solutions, there are no free robust alternatives, and the usual consensus is to store session state in freely available distributed cache solutions, or eliminate session state entirely from the application.

Moreover, even when session state is manageably stored in a distributed cache, most often, the same servers that are caching infrequently changing data are used to store session state. Sharing the cache this way leads to performance degradation.
This occurs because whenever the cache server needs to store a new cached object or remove an expired one, it has to momentarily suspend all read operations internally on all other cached objects until the object is added or removed. The overall outcome is sub-optimal reads for cached infrequently changing data.

Developers and architects should carefully weigh the aforementioned issues before moving locally stored session state to a distributed storage and should, whenever possible, opt for a solution that was specifically built for distributed session state storage.

Peer to Peer ASP.NET State Server

Introduction

ASP.NET web developers have three built in options to store session state, namely, in-process memory, SQL Server and State Server.

In-process memory offers the fastest performance but is unsuitable for use in web server farms because the session data is stored in the memory of the ASP.NET worker process.

SQL Server is an out of process session state storage option that works with web server farms. It stores session data in a SQL Server database. It is the most reliable option but the least performing one. One major issue with this option is that quite often developers want to cache data retrieved from a database in session state, to reduce database lookups. SQL Server session state defeats this purpose, because there is little performance gain in caching data retrieved from a database, in a database.

State Server is an out of process session state storage option that works with web server farms. It stores session data in memory and delivers better performance than SQL Server. This seems like a good compromise between the in-process option and the SQL server options. It has some drawbacks, however.

Firstly, several web servers typically depend on one state server for session state which introduces a critical single point of failure.

Secondly, in a load balanced environment, the load balancer may redirect a user’s request to a web server that is different from the web server that served the user’s previous request. If the new web server communicates with a different state server, the user’s original session state will not be found and the web application may not work properly.
This problem occurs even in persistence-based (aka sticky) load balancers either erroneously or due to server failure.

Thirdly, an issue that many developers are unaware about is that the web server and state server communicate in plain text. An eavesdropper can easily get hold of session state data traveling on the network. This may not be a threat if all servers are running in an internal network but it is certainly cause for concern when web servers and state servers are spread across the internet.

The peer to peer ASP.NET state server presented in this write-up addresses the aforementioned problems while transparently replacing the Microsoft provided state server.

Overview

The idea behind the peer to peer state server is simple -- let state servers on a network securely communicate and pass session state data amongst each other as needed, as shown below.


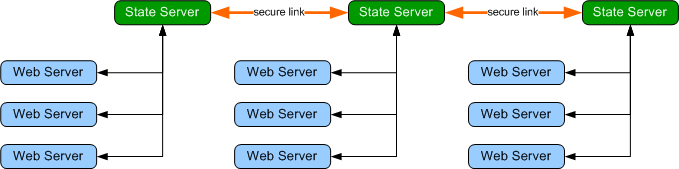
This design improves scalability because web servers can share multiple state servers, eliminating a single point of failure. Furthermore, if a load balancer erroneously or intentionally redirects a user to a different web server attached to a separate state server, the user’s session state will be requested from the state server that served the user’s previous request.

Security is also improved as peers can be configured to encrypt session data while sharing session state. Data transfers between the web server and the state server remain unencrypted but eavesdropping attacks can be eliminated by keeping web servers and linked state servers in trusted networks or on the same computer.

The peer to peer state server is fully backward compatible with the Microsoft provided state server and comes with all the benefits mentioned earlier.

Installation

To compile and install the state server:

  1. Download the source file.
    You can download the source code at https://github.com/tenor/p2pStateServer


  2. Open up the solution in visual studio. (Visual Studio 2008 will open up a Conversion Wizard. Complete the Wizard.)

    The state server comes in two flavors. One runs as a console application and the other one runs as a windows service. The StateService project compiles as a windows service and can be installed and uninstalled with the install_service.bat and uninstall_service.bat files. The ConsoleServer project runs the service as a console application, which is a lot easier to test and debug. Both projects share the same sources and function identically.


  3. Open up the properties window for the project you want to build.


  4. a. If using Visual Studio 2005, add NET20 in the conditional compilation symbols field of the Build tab.
    b. If using Visual Studio 2008, select .NET Framework 3.5 in the Target Framework field of the Application tab.


  5. Build the project.


  6. If you built the StateService project, navigate to the output folder and run install_service.bat to install the service.


  7. If you are already running the Microsoft state service on your machine, stop it.


  8. If you built and installed the windows service, you can start Peer to Peer State Service in the Services list. If you built the console server, run ConsoleServer.exe or simply start debugging from Visual Studio.


  9. You can now test and run any web applications you have with the running state server.


To add peer servers:

  1. Copy the compiled executable file and the application configuration file to another computer on your network.


  2. Open up the configuration file and add a new peer in the <Peers> section. For instance, to configure the state server to connect to another state server running on a computer named SV3 with a peer port number of 42425, you would add <add key="MyPeer" value="pc2:42425" /> to the <Peers> section.


  3. You can start the state server on the computer and it will link up with the other state server(s) on the network.


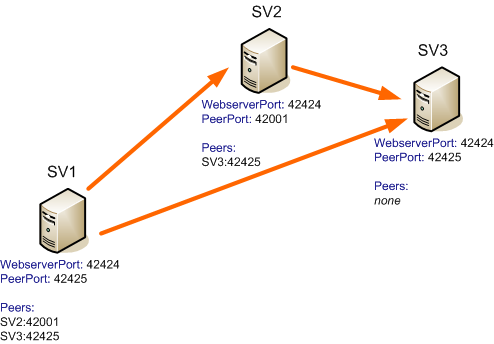
  4. It’s up to you to set up the network in any topology you like. For example, consider a network of three state servers as shown below, each state server on each machine would have the configuration shown below:


You can run multiple console server peers on the same computer but each console server must have a unique web server port and peer port setting.

How it works

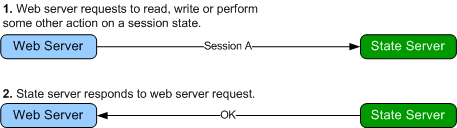
The Microsoft provided state server, works as shown below.


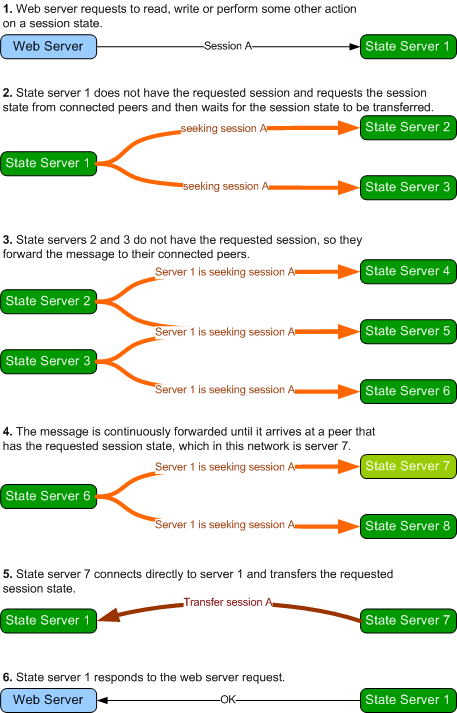
The Peer to Peer State Server works exactly as illustrated above, except when the state server doesn't have the requested session state, in which case it requests the session state from the network before responding, as illustrated below:

If the requested session state is not transferred within a set time period, the state server assumes the session state does not exist on the network and proceeds to process the web server request without the session state. The GetTransferMessage class represents the message that is broadcast on the network when a node is requesting a session. Peers maintain connection between themselves principally to forward this message. Session state transfers occur out-of-band of the peer network.

Implementation Notes

Various programming techniques are used to implement different aspects of the state server. Some of the notable ones are highlighted below.

PLATFORM

The state server is written in C# 2.0 but targets the NET 3.5 framework so as to take advantage of the ReaderWriterLockSlim class. If the NET20 symbol is defined, the server uses the slower ReaderWriterLock class instead and is able to target the .NET 2.0 framework.

You can download the source code at https://github.com/tenor/p2pStateServer

PROTOCOL

In order to create a state server that can transparently replace the state server, I needed to obtain and understand the full specification of the communication protocol between the web server and the Microsoft provided state server. The steps taken to piece out the protocol are documented in reverse chronology at http://ahuwanya.net/blog/category/Peer-to-Peer-Session-State-Service.aspx

MESSAGING

The server is largely message driven. The messaging subsystem is illustrated below:

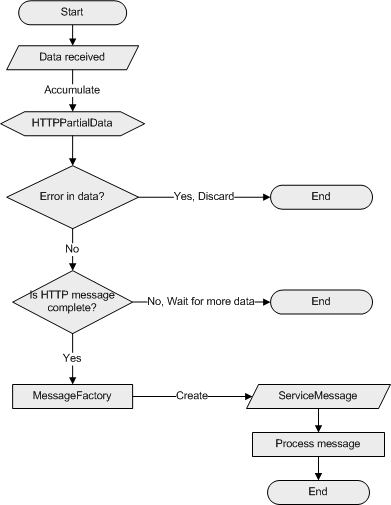
When the server receives data from a socket, the data is accumulated in an instance of the HTTPPartialData class currently assigned to that socket. The HTTPPartialData instance validates the data, determines if the accumulated data is a complete HTTP message and checks for errors in the accumulated data. If there is a data error (for example, if the data does not conform to HTTP), the entire accumulated data is discarded and the socket is closed. If the data is valid but not yet complete, the sockets waits for more data to arrive.
If the accumulated data is a complete HTTP message, the data is sent to a MessageFactory object. The MessageFactory object inspects the data to determine the appropriate ServiceMessage child class instance to create. The ServiceMessage child class is instantiated and its implementation of the Process method is called to process the message.

CONCURRENCY HANDLING

A pessimistic concurrency mechanism is employed while accessing session state in the session dictionary, which is defined by the SessionDictionary class. A piece of session state can only be read or modified by one thread at a time. A thread declares exclusive access to operate on a piece of session state by setting the IsInUse property to true. This is done by calling the atomic compare and swap CompareExchangeInUse method (a wrapper to the .NET Interlocked.CompareExchange method that operates on the IsInUse property). Setting this property to true lets other threads know that another thread is working with that session state.

If another thread wants to access the same session state and attempts to declare exclusive access, the attempt will fail because another thread already has exclusive access. The thread will keep trying to acquire exclusive access, and will eventually acquire it when the other thread releases access. This works pretty well because most of the time, only one thread needs to access a session state, and also because most operations on a session state take a very short time to complete. The export (transfer) operation which takes a much longer time is handled with a slightly different mechanism and is discussed in the contention management section below.

TIMERS – OR THE LACK OF THEM

The code has a lot of objects that expire or time-out and on which certain actions must take place on expiration – objects like individual session state dictionary entries that expire or asynchronous messages that timeout. Instead of assigning a timer or a wait handle to track these objects – they are stored in instances of a special collection class called the DateSortedDictionary. Objects in this dictionary are sorted in place by their assigned timestamps. Specially designated threads poll these date sorted dictionaries for expired items and perform related actions if an item is expired. This design significantly reduces the number of threads needed to keep track of expiring items.

DIAGNOSTICS

The Diags class is used to keep track of messages, log server activity and detect deadlocks. Methods on the Diags class are conditional and will not compile into release configuration code.
The VERBOSE symbol can be defined to view or log all activity taking place at the server. This is particularly useful with the console server which outputs this information to the console window. If the VERBOSE symbol is not defined, only critical information or unexpected errors are displayed.

Security

The Microsoft provided state server transmits and receives unencrypted data to and from the web server. This was most likely done for performance reasons. To be compatible with the Microsoft provided state server, the peer to peer state server transmits unencrypted data to the web server. However the peer to peer state server can be configured to transmit encrypted data between peers. This effectively thwarts network eavesdropping attacks if web server and associated state servers are installed on the same computer or on a trusted network.

For example, take the Web server – Microsoft State Server configuration shown below.

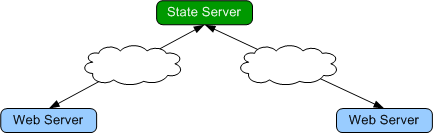
Two web servers connect across the public internet to access a state server.

Using peer to peer state servers, the network can be secured by having the web servers have their own local state servers that connects securely to the remote state server on their behalf as shown below:


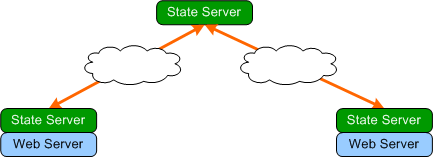
The local state servers can be installed on the same machine as the web server for maximum security and minimum latency.

This approach can help secure geographically distributed web and state servers.
Peer state servers also mutually authenticate each other while connecting, to ensure that the other party is an authorized peer.

Network Topologies

Connections between peers form logical networks which can be designed with common network topologies in mind.

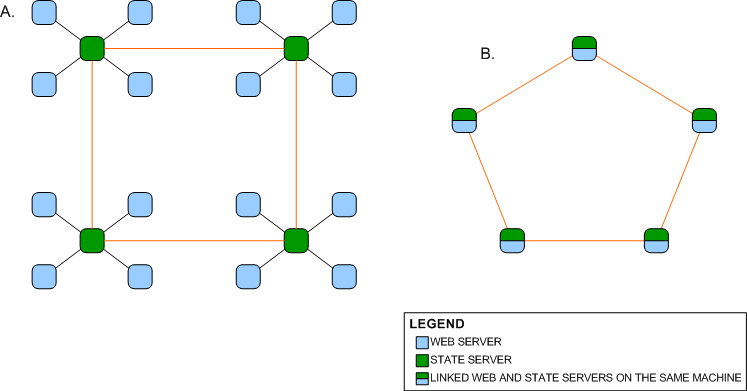
Network A shown above is a ring network of peer state servers which are individually connected to web servers whereas Network B is a ring network of computers which have both state server and web server connected and running. Existing isolated Microsoft state server networks can be upgraded to form a larger peer to peer network by replacing the Microsoft state servers with peer to peer state servers and linking them up as shown in Network A. Network B benefits from the security counter measures mentioned earlier and is somewhat more scalable since any node on the network is a web server and a peer state server.

Both networks will still function if one node fails, unlike on a bus network, however as more nodes are added to the network, the longer it takes for a message to traverse the network.


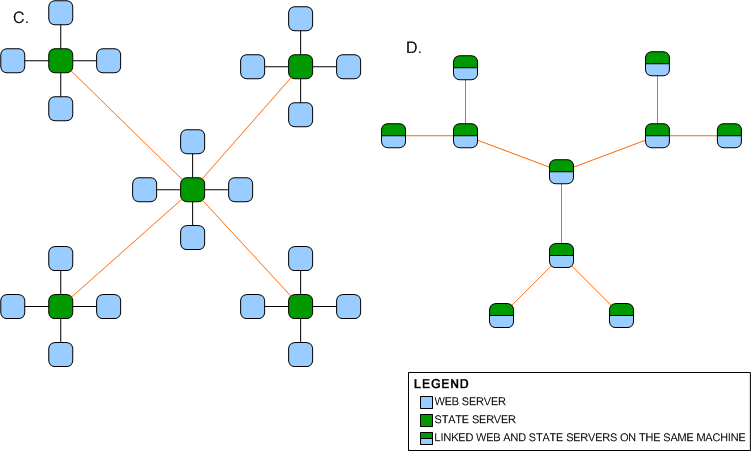
Network C is a star network. An advantage of having a star network is that no matter how many new nodes are added to the ring network, it takes only two hops for a message to reach any node on the network.

Network D is a network of three star networks that form a larger star network. This network too will require a lesser number of hops for a message to traverse the network. Both networks suffer from the disadvantage that if the central node fails, the entire network fails.

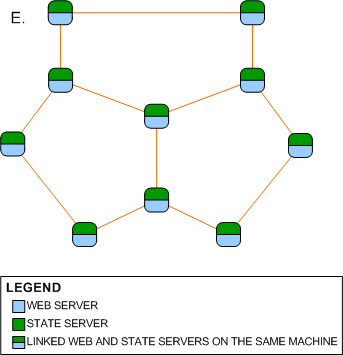
By connecting the leaf nodes on Network D, Network E, a partial mesh network is formed. Network E is a clever combination of a ring network and a star network. If the central node fails, the network will still function and it also takes a fewer number of hops for a message to traverse the network than on a ring network.

As demonstrated, the topology of the peer to peer state server network is limited only by the imagination of the network designer.

Interesting Scenarios

There are a lot of scenarios that occur in the state server that are handled using traditional peer to peer processes such as the time to live header which is used to prevent messages from circulating perpetually on the network, and message identifiers used by peers to recognize messages that have been seen earlier, however, there are two particular scenarios that occur in this peer network that are not so common.

SHUTDOWN TRANSFERS

To ensure that session data is not lost during a server shutdown, the state server proceeds to transfer all its session state data to connected peers in a round-robin fashion when a server shut down is initiated.
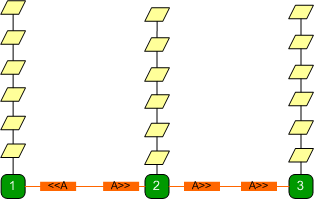
REBROADCASTS

A request for a session on a network can narrowly miss the node holding the session if it is being transferred it as illustrated below.

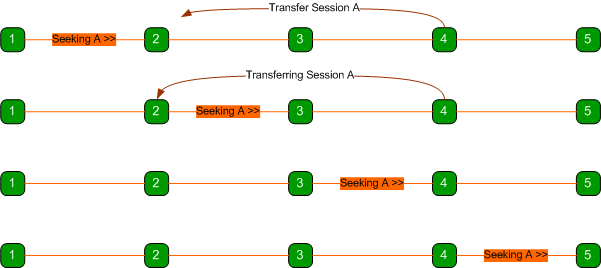
As shown above, node 1 is seeking session A from the network just about the same time node 4 wants to transfer the session to node 2.

When the message from node 1 reaches node 2, node 2 forwards the message to node 3 because it doesn’t have the session.

When the message reaches node 3, the session transfer between nodes 4 and 2 begins and by the time the message reaches node 4, the transfer is complete and node 4 no longer has the session anymore and forwards the message to node 5.

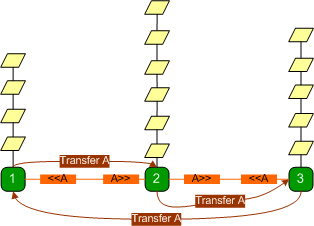
Thus, the message traverses the network without reaching any node with the sought session, even though the session exists on the network.

The state server addresses this issue by having nodes that recently transferred a session rebroadcast the message as shown below.

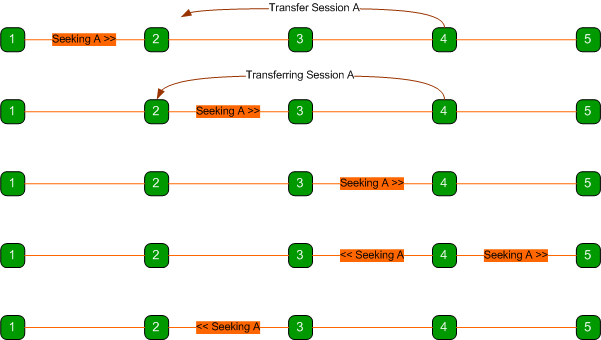
Here, node 4 rebroadcasts the message so that it also travels back the way it came and eventually reaches node 2 which has the session.

Rebroadcasted messages are duplicates of the original message except that they have a different Broadcast ID header which peers use to know it’s a different broadcast.

Contention Management

As stated earlier, the state server uses a pessimistic concurrency model when accessing session state entries in the session dictionary. This works well because most requests take a short time to process. However, one particular request can take a much longer time to process, and can lead to resource starvation and performance degradation.

A GetTransferMessage message broadcast is initiated by a peer when it needs to work with a session state it does not have. When the broadcast reaches a peer with the requested session state, the session state is transferred to the requesting peer.

Unlike other operations on a session state, a transfer can take a significant amount of time because the peer has to connect to the other peer, possibly authenticate, and transmit (a potentially large amount of) data. It’s important to note that any request from the web server can kick start a GetTransferMessage broadcast.

During a transfer, the session is marked as “in use” and other requests on that session will have to wait as usual. However, since it takes a much longer time, Threads waiting for a transfer operation to complete consume a lot of system resources. They can also timeout if the transfer takes too long or if the session is repeatedly transferred around the network due to flooded messages. A bad case is illustrated below:

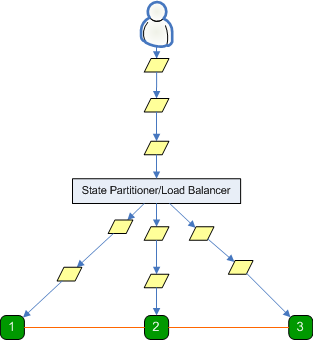
In the diagram above, a user is flooding a web application with requests, which in turn is causing session requests to be transmitted to a state server.

Because all requests originate from one user, all session requests reference the same session id. A load balancer or state partitioner distributes these requests among the three state servers.

It is important to note that even though it is unlikely that a load balancer or state partitioner will distribute requests for a session among different state servers, a user can produce the scenario shown above by simply pressing and holding the browser refresh key on a web application that uses a poorly implemented state partitioner or a malfunctioning load balancer.
Also, an organized group of malicious users (or a botnet) can produce this scenario even on properly functioning state partitioners and load balancers.

Each state server has requests waiting to be processed. If the highly in-demand session is say, on state server 3, requests on that state server will be processed one by one very quickly.

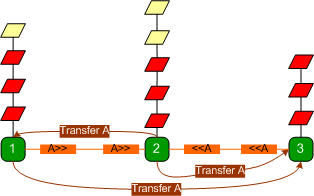
State servers 1 and 2 issue broadcasts requesting a session transfer. The message eventually reaches state server 3 and the request is transferred to say state server 2. Requests on state server 3 that were not processed will wait until the transfer is complete.

After the session transfer to server 2 is complete, requests on server 2 are processed, whereas requests on server 3 issue broadcasts requesting the session.

A broadcast that originated from state server 1 reaches state server 2 and the session is transferred to state server 1. This goes on and on and the servers keep transferring the session amongst themselves while most of the requests wait, because even when a session is transferred, the state server is only able to process a few requests before it is transferred to another state server.

To make matters worse, if a state server receives a GetTransferMessage message after it has recently transferred the session, it rebroadcasts the message (as explained earlier), which leads to even more GetTransferMessage broadcasts on the network, more back-and-forth transfers and prolonged resource starvation.

The transfer process is relatively slow and since all requests have to wait to be processed one at a time by each state server, requests start to time out and the web server starts discarding requests. The state server is unaware that the web server has discarded those requests and still proceeds to process them.

These redundant requests, waiting for their turn, eat up valuable server processor cycles and degrade the quality of service.

If plenty of these requests arrive, they'll quickly use up all processor resources and the server comes to a grinding halt.

While it may be impossible to stop any group of users from flooding the state server with requests, the state server guards against contentious sessions with the following principle: any degradation of service due to a contentious session should mainly affect the user of that session, and achieves this goal with the following mechanisms:

  1. When a request is to be processed and the server notices the session is being transferred, the request stops being processed and is queued to be processed when the transfer is over. This prevents the request from eating up processor cycles while waiting, and frees up resources, so that other requests from other users can be processed. If the number of requests on a queue waiting for a session to transfer is too long, then all those messages are discarded because it means the session is contentious and the server shouldn't bother processing them.


  2. After the transfer is complete and a queued request is ready to be reprocessed and the server notices that the same session is been transferred again by another request, then the request will be discarded and not be processed, because it means the session is highly contentious.


  3. Before a request tries to query the network (by broadcasting) for a session, it checks if it is expecting a reply from a previous query for that session, and if so, the request is queued to a list of requests to be processed when the query is received. This reduces the number of GetTransferMessage messages that will be generated on the network, which in turn reduces unnecessary rebroadcasts and lookups. If the number of requests on a queue waiting for a session to arrive is too long, then all those requests are discarded because it means the session is contentious.


  4. Finally, all incoming requests are queued up in their session id-specific queue and the message processor polls the incoming request queues in a round-robin manner and processes them one after the other, as shown below:


    This means that all session requests are treated fairly, no single user can significantly disrupt the rate at which messages originating from other users are processed. Additionally, if the queue for a particular session id is too long, that queue is discarded because it means that session is contentious.

All these techniques employed by the state server can only adversely affect the web application of the offending user.

Conclusion

The peer to peer state server is fully backward compatible with the Microsoft provided state server and can transparently replace it. Peer state servers can transfer sessions to each other, improving the reliability of session state dependent web applications. Peer state servers also act as a security layer that protects session data on the network.

This project started out as a simple idea but quickly evolved into a complex task. Hopefully, this implementation and other ideas presented in this article will be valuable to developers interested in distributed systems.  Due to the level of complexity, there will be bugs and kinks to work out. Contributions and bug reports will be appreciated.

Tamper proof and Obfuscate your Configuration Files

Introduction

The Signature Protected Configuration Provider is a configuration protection provider which can be used to protect configuration file sections from being tampered with. It can optionally obfuscate (scramble) those sections to improve privacy and discourage unauthorized modification.

You can download the source code at www.codeproject.com/KB/security/signedconfigprovider.aspx

Background

I always run into a tight corner whenever I need to encrypt sections of a configuration file because it seems I can’t find an easy, secure way to do it. The .NET provided RSAProtectedConfigurationProvider and DpapiProtectedConfigurationProvider providers tie configuration files to the machine and so, are unsuitable for XCopy deployment.

I started investigating how I could implement a secure, universal and portable configuration encryption/decryption scheme, and I found out it wasn’t possible – because of the nature of .NET applications.

Any kind of encryption scheme requires that the application use a decryption key to decrypt the encrypted information. .NET applications are easy to decompile, and the decompiled source can be examined to discover where the decryption key is read from. Even if it were possible to magically hide the key source, it’s not hard to read the decrypted information while the application is running, using a memory reader.

My point is, if the application can decrypt the information, so can an attacker.

The only reasonable thing that can be done is to obfuscate sections of the configuration file to make it much harder for the attacker. Additionally, it’s possible to securely prevent the attacker from modifying the configuration section. This can be quite useful in enterprise applications where you want only an administrator to be able to modify certain sections of a configuration file and end users to modify others.

Design

At its core, the Signature Protected Configuration Provider uses RSA asymmetric keys. The private key is used to sign the configuration section, which is optionally scrambled (obfuscated) by encrypting it using a symmetric key that is derived from the public key. The configuration section and the signature are enclosed in a new protected section and stored in the configuration file.

The provider has access to the public key and uses it to decrypt the configuration section (if it was encrypted) and to verify the signature with the configuration section to make sure it was not modified.

The provider can implicitly read the protected configuration section because it has access to the public key; however the private key is stored in a secure location inaccessible to the provider. Thus, the provider is implicitly read-only. Consequently, only someone who has access to the private key can modify the protected section.

The Code

The code is stored in the SignatureProtectedConfigurationProvider folder and the main class is the SignatureProtectedConfigurationProvider class.

You can download the source code at www.codeproject.com/KB/security/signedconfigprovider.aspx

The SignatureProtectedConfigurationProvider class inherits the ProtectedConfigurationProvider base class. The beauty of deriving from this class is that the .NET framework automagically decrypts information as needed from the configuration section if the section references the provider. For instance if you protected the appSettings section, you don’t need any special code to decrypt it, all you need to do is access the ConfigurationManager.AppSettings property like as usual. The Framework takes care of the decryption behind the scenes.

Normally, with other protected configuration providers, you can protect sections of your configuration file with the SectionInformation.ProtectSection method, however, the Signature Protected Configuration provider is a read-only provider and cannot implicitly protect a section. To explicitly protect a section, call the SignatureProctectedConfigurationProvider.Write method.

The Utils class contains utility methods called by the Provider class. Housing these methods in a separate class makes it easy to change the internal implementation without touching the provider code.

An important method is the Utils.GetPublicKey method. The public key (the RSA modulus and the exponent components) is also stored in this method. It is stored as either a byte array or a base-64 encoded string, depending on the setting of the StorePublicKeyAsBytes symbol.

The program.cs file is a console application that shows examples of using the provider to explicitly read a protected section, protect a section and generate new keys. You can also use the bundled Configuration File Editor to perform these tasks. (See below)

The Configuration File Editor

The editor was written to facilitate easy protection, unprotection and modification of configuration file sections. It works with existing configuration providers – so if you are tired of dropping to the command line to run aspnet_regiis.exe (with all its parameters), this is the tool you have been looking for.

The editor enables editing configuration files in a hierarchical manner. In fact, it can edit any xml file hierarchically. The editor can also generate new keys and supports other features necessary to configure the Signature Protected Configuration Provider.

The source code for the editor is in the ConfigFileEditor folder.

Using The Provider To Protect A New Configuration File

Run the Configuration File Editor, (you can perform these tasks by following the code samples in the provider program.cs file, but it’s a lot easier to use the configuration editor)

1. Open the Configuration File (you can open the bundled sample.config file)

2. Click the tools menu, then select ‘Generate configProtectedData Element’ under the ‘Signature Protected provider’ sub-menu.

The Generate configProtectedData Element window appears.

3. Click the ‘Add to Configuration’ button.

This action adds XML elements required for the .NET framework to use the provider from your application.

4. Click the tools menu, and then select ‘Generate New Key Pair’ under the ‘Signature Protected provider’ sub-menu.

The Generate New RSA Key Pair window appears.

This window contains the private/public key information. It is important that you store this information in a secure location that is not accessible from your application. Without this information, it is not possible to modify protected sections.

5. Click ‘Copy To Clipboard’ to copy the information to the Windows Clipboard.

6. Click the Close button.

7. Save the key information (in the clipboard) to your secure location.

8. As an example, right click the appSettings node on the side-bar on the left side of the editor to open a context menu.

9. Select ‘Protect’

The Select Provider window appears.

10. You can choose which protection provider you want to use (you will see the RsaProtectedConfigurationProvider and the DataProtectionConfigurationProvider options)

11. Select the SignatureProtectedConfigurationProvider option.

12. You can uncheck the ‘Obfuscate section’ checkbox if you want your users to be able to read the protected information -- don't worry, they still won't be able to modify it.

13. Click the OK button.

14. You will be prompted for the key – you can just paste the entire XML you saved in step 7 and click OK.

The section will be protected. You can protect other sections as you wish by repeating steps 8 to 13.

15. Save the file by selecting ‘Save’ under the File menu.

Now you need to set up the provider to work from your application.

16. Copy SignedConfigProvider.cs and SignedConfigUtils.cs files from the SignatureProtectedConfigurationProvider folder to your application’s project folder.

17. Add the files to your project so that they appear in Visual Studio’s solution explorer.

18. Open up SignedConfigUtils.cs from within your project and navigate to the GetPublicKey method

19. Open the key information file you stored securely earlier (at step 7), look at the section titled PUBLIC KEY INFORMATION. You have to replace the public key in the GetPublicKey method with the one in that section.

You can do this either by replacing the byte arrays in the method with the ones in the file or by replacing the modulus and exponent strings in the method. You have to change the StorePublicKeyAsBytes symbol to use the latter method. I prefer to use byte arrays because they are easier to manipulate.

Now, your application will transparently read the protected sections.

Using The Provider To Modify A Protected Configuration File

1. Open the configuration file with the Configuration Editor.

2. Click to select the protected node on the left side-bar of the editor.

3. You will be prompted for the private key.

4. Paste the private key (you can paste the entire xml) you previously securely stored.

5. Make the changes you want to make.

6. Click 'Apply Changes'.

7. Save the Configuration File.

Security Notes

To check if a section was protected with the provider from your application, include code that examines the SectionInformation.ProtectionProvider property to make sure it’s the same type as the SignatureProtectedConfigurationProvider class.

The public key is embedded in the provider code and not stored in an external file because if it is read from a file or read from a library; an attacker can generate his own private/public key pair, modify the configuration section and protect it using his keys and replace the public key in the file or library with his.
As a consequence, make sure you compile the provider (with the embedded public key) into your application. Do not compile the provider as a dynamically linked library.

It is important to note that the obfuscation aspect of this provider is performed using the public key which is accessible to anyone who has access to your application. Do not depend on this provider to secure sensitive information like database connection strings. This provider is more suited for protecting important information like web service urls from unauthorized modification.
You can make it harder for an attacker to figure out what the public key is by making the ReadPublicKey method harder to understand and by obfuscating the application after compilation, but it’s safer to treat the public key for what it is – public.

Always use the same key to protect all sections in a configuration file. It is possible to accidentally protect different sections with different keys while using the configuration file editor. Protecting different sections using different keys will render some sections of the configuration file undecipherable by the provider because it has access to only one public key.
You can enter comments in your configuration file and in the public/private key XML to help you remember which key protects which configuration file.

Points of Interest

The proper way to package signed XML is to use the XML Signature standard format . The System.Security.Cryptography.Xml.SignedXml class implements this standard, however for the sake of brevity; the provider simply encloses the plain (or obfuscated) configuration section in the SignedInfo element, and the base-64 encoded signature is enclosed in the SignatureValue element.
Both elements are enclosed inside an EncryptedData element which replaces the contents of the original unprotected element.

The proper way to encrypt data with asymmetric keys is to encrypt the data using a symmetric encryption algorithm and then encrypt the symmetric key using the asymmetric keys. In this case, I needed to encrypt the symmetric key using the private key and decrypt it using the public key.
I couldn’t do this because the .NET implementation of the RSA algorithm only lets you encrypt with the public key and decrypt with the private key; which makes sense, because, data that can be decrypted with the public key is in reality, plain-text; since everybody has access to the public key.
However, I’m more interested in obfuscation than secure encryption so I simply used portions of the public key to create the symmetric key used to perform the encryption and decryption. The Utils.GetAESFromRSAParameters method instantiates a RijnDaelManaged object using the public key parameters.
This approach doesn’t improve or reduce security because either way, you only need access to the public key to read the encrypted information.

Conclusion

This is a truly portable configuration protection provider. It works on both desktop and web applications.

It can obfuscate the configuration section – this feature, when combined with obfuscation of the compiled application can make it very difficult for an attacker to read sections of the configuration file.

It also securely prevents modification to critical sections of your configuration file. Furthermore, it can be extended to facilitate secure messaging in a client/server environment because the application can use the embedded public key to verify that the transmission is from the right source.

References

How To: Encrypt Configuration Sections in ASP.NET 2.0 using RSA
Implementing a Protected Configuration Provider
XML Signature Syntax and Processing

Generate Stored Procedure Wrapper Methods and Associated Wrapper Classes

Introduction

It is generally a good idea to create a wrapper method for every stored procedure that an application needs to call. Such methods can then be grouped into a single data access utility class. This approach improves type safety and portability.

These methods generally call the Command.ExecuteScalar, Command.ExecuteNonQuery and Command.ExecuteReader ADO.NET methods. They also perform tasks like checking if the Connection object is still connected, adding stored procedure parameters to the Command object, making sure the DataReader object is properly disposed, etc.

On the average, there are about fifty lines of code for a properly written method that wraps an ExecuteReader call! Writing these methods easily eats into overall development time on data-intensive projects that access many stored procedures.

Developers usually resort to copying and pasting code from other wrapper methods and modifying the code to suit the stored procedure call. This process often leads to bugs due to human error.

I figured that since most of these methods share a common programming pattern; it should be possible to describe what your stored procedure looks like to a code generation tool and have the tool generate these methods. Nothing as complex as AutoSproc, just a light tool that lets a developer specify details of the stored procedure, and then generate the wrapper method code.

Implementation

This tool was developed with ASP.NET 2.0. It makes code generation decisions based on information provided by the user – pretty much the same way a human developer would make coding decisions.
It supports .NET 1.1 and .NET 2.0 features, for instance it would create nullable variables for nullable fields if .NET 2.0 is selected. It supports the SQL Server and ODBC data providers.

The actual code generation code (no pun intended) is in APP_Code\MethodGen.cs while the user interface code is in the sprocmethodgen.aspx.
The code generation code can easily be used by another application with a different user interface (for instance, a desktop-application that supplies most of the input from the actual database schema). It can also be easily modified to follow a different programming pattern or support more ADO.NET features.

The meat of the code generation code lies in the GenerateMethod, GenerateTryClause and GenerateResultsWrapperClass methods of the MethodGenerator class. The GenerateMethod method generates the non-varying parts of the method such as sections that add parameters to a command object. It also calls the GenerateTryClause method and optionally the GenerateResultsWrapperClass method.

The GenerateTryClause method generates the big try clause in the method which varies greatly, depending on what type of execution was selected.

The GenerateResultsWrapperClass method generates a class which stores results returned by a DataReader. (It’s better to return a list of strongly typed objects than returning a DataTable.)

Using the Tool

This example uses the ‘Sales by Year’ stored procedure in the Northwind database.

1) Run the ASP.NET solution, and navigate to the web page.

This tool is also available at www.ahuwanya.net/tools/sprocmethodgen/

2) Specify the .NET Version, Data Provider, Stored Procedure name, and Type of Execution.

3) The Sales by Year stored procedure has two input parameters, so specify the two input parameters:

4) After running the stored procedure, it is discovered that it has four columns in the result set, so specify the four result columns:


5) Specify the name of the class that will store the results and the name of the generated method.

6) Click the Generate Code! button to generate the code. You may need to scroll down on the page.
(To view the generated code, click the expand source button below.)

internal static List<SalesInfo> GetSalesByYear(DateTime StartDate, DateTime EndDate, SqlConnection DBConn )
{
	//TODO: Insert method into your data access utility class
	
	//Check if connection is null
	if(DBConn == null)
	{
		throw new ArgumentNullException("DBConn");
	}

	//Open connection if it's closed
	bool connectionOpened = false;
	if(DBConn.State == ConnectionState.Closed)
	{
		DBConn.Open();
		connectionOpened = true;
	}

	//TODO: Move constant declaration below directly into containing class
	const string sprocGetSalesByYear = "[Sales by Year]";

	string sproc = sprocGetSalesByYear;

	SqlCommand cmd = new SqlCommand(sproc,DBConn);
	cmd.CommandType = CommandType.StoredProcedure;
	cmd.Parameters.Add("@Beginning_Date",SqlDbType.DateTime ).Value = StartDate;
	cmd.Parameters.Add("@Ending_Date",SqlDbType.DateTime ).Value = EndDate;
	
	List<SalesInfo> result = new List<SalesInfo>();
	SqlDataReader rdr;
	
	try
	{
		rdr = cmd.ExecuteReader();

		try
		{
			if (rdr.HasRows)
			{
				int shippeddateOrdinal = rdr.GetOrdinal("ShippedDate");
				int orderidOrdinal = rdr.GetOrdinal("OrderID");
				int subtotalOrdinal = rdr.GetOrdinal("Subtotal");
				int yearOrdinal = rdr.GetOrdinal("Year");
				
				while (rdr.Read()) 
				{
					// declare variables to store retrieved row data
					DateTime? shippeddateParam;
					int orderidParam;
					decimal subtotalParam;
					string yearParam;
					
					// get row data
					if (rdr.IsDBNull(shippeddateOrdinal))
					{
						shippeddateParam = null;
					}
					else
					{
						shippeddateParam = rdr.GetDateTime(shippeddateOrdinal);
					}
					orderidParam = rdr.GetInt32(orderidOrdinal);
					subtotalParam = rdr.GetDecimal(subtotalOrdinal);
					if (rdr.IsDBNull(yearOrdinal))
					{
						yearParam = null;
					}
					else
					{
						yearParam = rdr.GetString(yearOrdinal);
					}
					
					// add new SalesInfo object to result list
					result.Add(new SalesInfo(shippeddateParam,orderidParam,subtotalParam,yearParam));
					
				}
			}
		}
		finally
		{
			rdr.Close();
		}
		
	}
	catch(Exception ex)
	{
		//TODO: Handle Exception
		throw ex;
	}
	finally
	{
		cmd.Dispose();

		if(connectionOpened ) // close connection if this method opened it.
		{
			DBConn.Close();
		}
	}

	return result;
	

}

[Serializable]
public class SalesInfo
{
	//TODO: Integrate this class with any existing data object class

	private DateTime? shippeddate;
	private int orderid;
	private decimal subtotal;
	private string year;
	
	public SalesInfo(DateTime? ShippedDate, int OrderID, decimal SubTotal, string Year)
	{
		shippeddate = ShippedDate;
		orderid = OrderID;
		subtotal = SubTotal;
		year = Year;
		
	}

	public SalesInfo()
	{
		shippeddate = null;
		orderid = 0;
		subtotal = 0;
		year = null;
		
	}

	public DateTime? ShippedDate
	{
		get { return shippeddate; }
		set { shippeddate = value; }
	}

	public int OrderID
	{
		get { return orderid; }
		set { orderid = value; }
	}

	public decimal SubTotal
	{
		get { return subtotal; }
		set { subtotal = value; }
	}

	public string Year
	{
		get { return year; }
		set { year = value; }
	}

	
}

7) Copy the generated code into your project.

8) Add the following namespaces to your project.

using System.Data; 
using System.Data.SqlClient; //if using SQL Server Data Provider
using System.Data.Odbc; //if using ODBC Provider
using System.Collections.Generic; //if using .NET 2.0 or later
using System.Collections //if using .NET 1.1

9) Look for //TODO: comments in the generated code and act accordingly. The code will still work, even if the //TODO: comments are ignored.

10) Now you can simply access the sales data from your project with the following statements:

 //Create Sql connection
SqlConnection conn = new SqlConnection(@"Data Source=.\SQLEXPRESS;Initial Catalog=Northwind;Integrated Security=True");
//Get Sales Information
List<SalesInfo> sales = GetSalesByYear(new DateTime(1992,1,1),new DateTime(2008,1,1),conn);

Considerations and Limitations

Obviously, this tool cannot generate code for every conceivable ADO.NET database access scenario, however, it’s a lot better to generate a great deal of the code and then modify the code as needed, than to type everything by hand.

Some limitations of this tool include:

Generates only C# code: The best way to make this tool to be language neutral would be to use CodeDom to generate the code, however, this approach would make this tool harder to maintain and extend – It would be an overkill for the scope of this project.
Fortunately, there are lots of C#-to-VB.NET code conversion tools available for VB.NET developers who would like to use this tool.

Lacks support for Output Parameters: This tool only supports input parameters and optionally returns the stored procedure return parameter. The generated code can be manually modified to accommodate other types of parameters.

Lacks support for OLEDB and Oracle Data Providers: This tool only generates code for ODBC and SQL Server Data providers.

Reads only the first Result Set: If your stored procedure returns multiple result sets, one way to handle this is to generate a method for the first result set (choose ExecuteReader), then generate another method as if the second result set were actually the first result set, copy the code that reads the result data and paste it into the first method after calling rdr.NextResults(), change the name of the results variable in the pasted code and pass it back as an out parameter.
Do this for every result set returned.

Lacks support for DbCommand object properties: If you are looking for Transaction, CommandTimeOut, CommandBehavior objects etc. -- It’s easy to modify the generated code for these properties.

Unsuitable for Large Result sets: This tool generates code which returns result sets as an ArrayList or an List of strongly-typed objects. This tool will perform poorly if your stored procedure returned hundreds of thousands of rows because it would have to store all these rows. You should write your own data access method for such scenarios.
Moreover, if your stored procedure returns hundreds of thousands of rows, I recommend you look into implementing some kind of paging mechanism to reduce the number of rows returned.