Introduction
The Signature Protected Configuration Provider is a configuration protection provider which can be used to protect configuration file sections from being tampered with. It can optionally obfuscate (scramble) those sections to improve privacy and discourage unauthorized modification.
Background
I always run into a tight corner whenever I need to encrypt sections of a configuration file because it seems I can’t find an easy, secure way to do it. The .NET provided RSAProtectedConfigurationProvider and DpapiProtectedConfigurationProvider providers tie configuration files to the machine and so, are unsuitable for XCopy deployment.
I started investigating how I could implement a secure, universal and portable configuration encryption/decryption scheme, and I found out it wasn’t possible – because of the nature of .NET applications.
Any kind of encryption scheme requires that the application use a decryption key to decrypt the encrypted information. .NET applications are easy to decompile, and the decompiled source can be examined to discover where the decryption key is read from. Even if it were possible to magically hide the key source, it’s not hard to read the decrypted information while the application is running, using a memory reader.
My point is, if the application can decrypt the information, so can an attacker.
The only reasonable thing that can be done is to obfuscate sections of the configuration file to make it much harder for the attacker. Additionally, it’s possible to securely prevent the attacker from modifying the configuration section. This can be quite useful in enterprise applications where you want only an administrator to be able to modify certain sections of a configuration file and end users to modify others.
Design
At its core, the Signature Protected Configuration Provider uses RSA asymmetric keys. The private key is used to sign the configuration section, which is optionally scrambled (obfuscated) by encrypting it using a symmetric key that is derived from the public key. The configuration section and the signature are enclosed in a new protected section and stored in the configuration file.
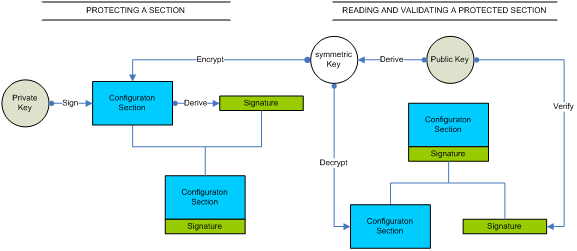
The provider has access to the public key and uses it to decrypt the configuration section (if it was encrypted) and to verify the signature with the configuration section to make sure it was not modified.
The provider can implicitly read the protected configuration section because it has access to the public key; however the private key is stored in a secure location inaccessible to the provider. Thus, the provider is implicitly read-only. Consequently, only someone who has access to the private key can modify the protected section.
The Code
The code is stored in the SignatureProtectedConfigurationProvider folder and the main class is the SignatureProtectedConfigurationProvider class.
The SignatureProtectedConfigurationProvider class inherits the ProtectedConfigurationProvider base class. The beauty of deriving from this class is that the .NET framework automagically decrypts information as needed from the configuration section if the section references the provider. For instance if you protected the appSettings section, you don’t need any special code to decrypt it, all you need to do is access the ConfigurationManager.AppSettings property like as usual. The Framework takes care of the decryption behind the scenes.
Normally, with other protected configuration providers, you can protect sections of your configuration file with the SectionInformation.ProtectSection method, however, the Signature Protected Configuration provider is a read-only provider and cannot implicitly protect a section. To explicitly protect a section, call the SignatureProctectedConfigurationProvider.Write method.
The Utils class contains utility methods called by the Provider class. Housing these methods in a separate class makes it easy to change the internal implementation without touching the provider code.
An important method is the Utils.GetPublicKey method. The public key (the RSA modulus and the exponent components) is also stored in this method. It is stored as either a byte array or a base-64 encoded string, depending on the setting of the StorePublicKeyAsBytes symbol.
The program.cs file is a console application that shows examples of using the provider to explicitly read a protected section, protect a section and generate new keys. You can also use the bundled Configuration File Editor to perform these tasks. (See below)
The Configuration File Editor
The editor was written to facilitate easy protection, unprotection and modification of configuration file sections. It works with existing configuration providers – so if you are tired of dropping to the command line to run aspnet_regiis.exe (with all its parameters), this is the tool you have been looking for.
The editor enables editing configuration files in a hierarchical manner. In fact, it can edit any xml file hierarchically. The editor can also generate new keys and supports other features necessary to configure the Signature Protected Configuration Provider.
The source code for the editor is in the ConfigFileEditor folder.
Using The Provider To Protect A New Configuration File
Run the Configuration File Editor, (you can perform these tasks by following the code samples in the provider program.cs file, but it’s a lot easier to use the configuration editor)
1. Open the Configuration File (you can open the bundled sample.config file)
2. Click the tools menu, then select ‘Generate configProtectedData Element’ under the ‘Signature Protected provider’ sub-menu.
The Generate configProtectedData Element window appears.
3. Click the ‘Add to Configuration’ button.
This action adds XML elements required for the .NET framework to use the provider from your application.
4. Click the tools menu, and then select ‘Generate New Key Pair’ under the ‘Signature Protected provider’ sub-menu.
The Generate New RSA Key Pair window appears.
This window contains the private/public key information. It is important that you store this information in a secure location that is not accessible from your application. Without this information, it is not possible to modify protected sections.
5. Click ‘Copy To Clipboard’ to copy the information to the Windows Clipboard.
6. Click the Close button.
7. Save the key information (in the clipboard) to your secure location.
8. As an example, right click the appSettings node on the side-bar on the left side of the editor to open a context menu.
9. Select ‘Protect’
The Select Provider window appears.
10. You can choose which protection provider you want to use (you will see the RsaProtectedConfigurationProvider and the DataProtectionConfigurationProvider options)
11. Select the SignatureProtectedConfigurationProvider option.
12. You can uncheck the ‘Obfuscate section’ checkbox if you want your users to be able to read the protected information -- don't worry, they still won't be able to modify it.
13. Click the OK button.
14. You will be prompted for the key – you can just paste the entire XML you saved in step 7 and click OK.
The section will be protected. You can protect other sections as you wish by repeating steps 8 to 13.
15. Save the file by selecting ‘Save’ under the File menu.
Now you need to set up the provider to work from your application.
16. Copy SignedConfigProvider.cs and SignedConfigUtils.cs files from the SignatureProtectedConfigurationProvider folder to your application’s project folder.
17. Add the files to your project so that they appear in Visual Studio’s solution explorer.
18. Open up SignedConfigUtils.cs from within your project and navigate to the GetPublicKey method
19. Open the key information file you stored securely earlier (at step 7), look at the section titled PUBLIC KEY INFORMATION. You have to replace the public key in the GetPublicKey method with the one in that section.
You can do this either by replacing the byte arrays in the method with the ones in the file or by replacing the modulus and exponent strings in the method. You have to change the StorePublicKeyAsBytes symbol to use the latter method. I prefer to use byte arrays because they are easier to manipulate.
Now, your application will transparently read the protected sections.
Using The Provider To Modify A Protected Configuration File
1. Open the configuration file with the Configuration Editor.
2. Click to select the protected node on the left side-bar of the editor.
3. You will be prompted for the private key.
4. Paste the private key (you can paste the entire xml) you previously securely stored.
5. Make the changes you want to make.
6. Click 'Apply Changes'.
7. Save the Configuration File.
Security Notes
To check if a section was protected with the provider from your application, include code that examines the SectionInformation.ProtectionProvider property to make sure it’s the same type as the SignatureProtectedConfigurationProvider class.
The public key is embedded in the provider code and not stored in an external file because if it is read from a file or read from a library; an attacker can generate his own private/public key pair, modify the configuration section and protect it using his keys and replace the public key in the file or library with his.
As a consequence, make sure you compile the provider (with the embedded public key) into your application. Do not compile the provider as a dynamically linked library.
It is important to note that the obfuscation aspect of this provider is performed using the public key which is accessible to anyone who has access to your application. Do not depend on this provider to secure sensitive information like database connection strings. This provider is more suited for protecting important information like web service urls from unauthorized modification.
You can make it harder for an attacker to figure out what the public key is by making the ReadPublicKey method harder to understand and by obfuscating the application after compilation, but it’s safer to treat the public key for what it is – public.
Always use the same key to protect all sections in a configuration file. It is possible to accidentally protect different sections with different keys while using the configuration file editor. Protecting different sections using different keys will render some sections of the configuration file undecipherable by the provider because it has access to only one public key.
You can enter comments in your configuration file and in the public/private key XML to help you remember which key protects which configuration file.
Points of Interest
The proper way to package signed XML is to use the XML Signature standard format . The System.Security.Cryptography.Xml.SignedXml class implements this standard, however for the sake of brevity; the provider simply encloses the plain (or obfuscated) configuration section in the SignedInfo element, and the base-64 encoded signature is enclosed in the SignatureValue element.
Both elements are enclosed inside an EncryptedData element which replaces the contents of the original unprotected element.
The proper way to encrypt data with asymmetric keys is to encrypt the data using a symmetric encryption algorithm and then encrypt the symmetric key using the asymmetric keys. In this case, I needed to encrypt the symmetric key using the private key and decrypt it using the public key.
I couldn’t do this because the .NET implementation of the RSA algorithm only lets you encrypt with the public key and decrypt with the private key; which makes sense, because, data that can be decrypted with the public key is in reality, plain-text; since everybody has access to the public key.
However, I’m more interested in obfuscation than secure encryption so I simply used portions of the public key to create the symmetric key used to perform the encryption and decryption. The Utils.GetAESFromRSAParameters method instantiates a RijnDaelManaged object using the public key parameters.
This approach doesn’t improve or reduce security because either way, you only need access to the public key to read the encrypted information.
Conclusion
This is a truly portable configuration protection provider. It works on both desktop and web applications.
It can obfuscate the configuration section – this feature, when combined with obfuscation of the compiled application can make it very difficult for an attacker to read sections of the configuration file.
It also securely prevents modification to critical sections of your configuration file. Furthermore, it can be extended to facilitate secure messaging in a client/server environment because the application can use the embedded public key to verify that the transmission is from the right source.
References
How To: Encrypt Configuration Sections in ASP.NET 2.0 using RSA
Implementing a Protected Configuration Provider
XML Signature Syntax and Processing